What’s New in Windows 8.1 Update 1

11.4.14 3 comments
We told you earlier about Windows 8.1 Update 1 which will bring many new features and improvements to Windows 8.1 such as improvements to Start Screen, Metro UI aka Modern UI, Internet Explorer, etc.
Everything You Need to Know About Windows 8.1 Update 1
The good news is that Microsoft has released Windows 8.1 Update 1 for TechNet and MSDN subscribers and the same
will be released to public on next Tuesday April 8th is also available for download to public:
Windows 8.1 Update 1 is available free for Windows 8.1 users via Windows Update. If you are still using Windows 8, you'll be able to install Windows 8.1 Update 1 directly through Windows Store for free.
For interested people, the update number of Windows 8.1 Update 1 will be KB2919355.
Now lets talk about some interesting features present in Windows 8.1 Update 1:
Power and Search Buttons on Start Screen
Windows 8.1 Update adds much requested Power and Search buttons to Start Screen. In Windows 8, the power options were present under Settings charm and in Windows 8.1, Microsoft added the power options to Win+X Menu but still many people were having troubles in finding those options.
Now people will have no problem in finding options to shut down, restart or hibernate their computers in Windows 8.1 Update. You'll be able to use these power options directly and easily via Start Screen.
Its quite similar to what we requested in our Wishlist topic.
Direct Boot into Desktop by Default
When Microsoft introduced Start Screen in Windows 8, many users complained about the direct boot to Start Screen feature. People wanted to direct boot into Windows Desktop as they used to do in earlier versions of Windows. After getting many requests, Microsoft added a new option to enable direct boot into Desktop in Windows 8.1.
But the option was not enabled by default and the operating system was still booting directly to Start Screen.
In Windows 8.1 Update, the option to direct boot into Desktop will be enabled by default for selected devices such as Desktops and laptops.
Pin Metro Apps to Taskbar
In Windows 8 and 8.1, users were restricted to run Metro apps only from Start Screen but in Windows 8.1 Update, you'll be able to pin metro apps and websites to Taskbar so that you can launch them directly from your Desktop. Windows Store will come pinned to Taskbar by default so that you can easily install new apps.
Also you'll be able to use Taskbar while working on a metro app. Just move the mouse cursor to the bottom edge of your computer screen and it'll show the Taskbar so that you can switch between apps or start a new app.

Titlebar with Minimize and Close Buttons in Metro Apps
Finally the much awaited feature comes to Windows 8.1 Update. Now you'll be able to access titlebar in any metro app similar to traditional Desktop programs. Simply move your mouse cursor to the top of your computer screen and you'll be able to find buttons to minimize or close metro apps using this titlebar.
Also if you right-click on the app icon present at the left-side of titlebar, you'll get a context menu containing various options such as "Split Left/Right" which allow you to split the running app across the left or right half of the Desktop.
Right-Click Context Menu on Start Screen Tiles
That's another great improvement for Start Screen in Windows 8.1 Update. In Windows 8 and 8.1, when you right-click on a tile in Start Screen, you get the App Bar on bottom of the screen to access related options. It becomes quite annoying for many users as they need to move the mouse to bottom to click on those options.
In Windows 8.1 Update, Microsoft has replaced this App Bar with traditional context menu similar to Desktop and Windows Explorer. Now when you right-click on a tile in Windows 8.1 Update, you get context menu to perform various operations such as unpin a tile, pin to Taskbar, change tile size or uninstall the app.
New Apps Installed Notification on Start Screen
Its another useful addition to Start Screen. Now whenever you install a new Metro app or Desktop program, the little arrow on Start Screen shows a notification about the new installed apps along with their count:
Once you click on the notification, it opens All Apps page which highlights the newly installed apps by showing "NEW" term next to the app name. The "NEW" text disappears as soon as you click on the app name.
Windows 8.1 Update 1 also allows you to show more apps with small icons in All Apps page:
Internet Explorer 11 Improvements
Internet Explorer 11 in Windows 8.1 Update has the built-in functionality to detect the device and input type so that it can install the appropriate version of IE on the device. It runs in portrait mode on a tablet and in normal Desktop program mode on computers and laptops.
You'll also notice many UI refinements such as size of fonts, menus, number of tabs, etc in IE11 under Windows 8.1 Update.
PS: This updated version of Internet Explorer 11 will also be available for Windows 7 users.
Wi-Fi Connection Context Menu Added Back
Oh yeah. Now you can get the good ol' context menu options while right-clicking on your Wi-Fi connection entry present in the right-sidebar which appears when you click on Internet connection icon present in Taskbar notification area.


Download Microsoft .NET Framework 3.5 Offline Installer for Windows 8 and 8.1

Download Microsoft .NET Framework 3.5 Offline Installer for Windows 8 

and 8.1

Microsoft's latest OS Windows 8 comes with version 4.5 of .NET Framework which is required to run software programs developed using the same version of .NET. But there is one slight problem! Most of the existing software require version 3.5 of .NET Framework installed to be able to run. When you try to install .NET Framework 3.5 in Windows 8, it asks you to connect to Internet to download required installation files.
For people who don't have Internet connection or who don't want to waste their Internet connection bandwidth in downloading .NET Framework 3.5 files from Internet, we shared a tutorial in past to install .NET Framework 3.5 offline in Windows 8 without Internet connection:
The method mentioned in the above article works fine in all editions of Windows 8 but sometimes a few people face problems while installing .NET Framework 3.5 offline. Some people get error messages while executing the command. Most of the times these problems occur due to incorrect syntax in command or due to insufficient permissions.
To solve all these problems today in this article, we are going to share a free, small and portable tool for all Windows 8 users. This small utility has been developed by AskVG reader "Cedric Poottaren", so big thanks goes to him.
"Microsoft .NET Framework 3.5 Offline Installer" is a freeware created for Windows 8 which helps you in installing .NET Framework 3.5 in your system without any need of Internet connection.

You just need to insert your Windows 8 setup disc in your CD/DVD drive and then select the correct drive letter in the freeware and then click on "Start Installation" button. That's it. It'll automatically execute the required command and will install .NET Framework 3.5 in Windows 8.
If you don't have Windows 8 setup disc or if you don't want to install .NET Framework 3.5 from setup disc, you can use the setup folder of Windows 8 present on your hard drive. For example, if you copied Windows 8 setup files in E:\ drive of your hard disk, you can click on "Browse" button given in the freeware and then go to the Windows 8 setup folder. Select "sxs" folder present under "sources" folder and then click on "Install" button to install .NET Framework 3.5 in your system.
This small piece of software also provides debugging options for advanced users. You can go to "Configuration" tab and enable the option to show installation process. It'll help you in finding the culprit in case you face any problem while installing .NET Framework 3.5 in Windows 8.
This software will work in both 32-bit (x86) and 64-bit (x64) editions of Windows 8. You'll need to run the software with Administrator privileges by right-click on the program icon and select "Run as Administrator" option. Its required because the method only works if the user has Administrator privileges.
You can download the software using following link:

How To Disable Last Seen Timestamp Feature of WhatsApp

8.12.13 4 comments
WhatsApp is now something that nobody can avoid from their life. It is a great messenger application that available for variety of Smartphones platforms like Android, Windows Phone, BlackBerry etc. In a couple of years, this app has owned a ton of Smartphone users. Just a few months ago, in march, WhatsApp hits 250 million active users. Of course, it is because of WhatsApp awesome features like live chat, media sharing, sharing locations and more. Overall, everything is quite  handy in this app. But while looking at its "Last seen Timestamp" feature, it is one thing that annoys most of WhatsApp users. Actually, it works for displaying a particular person who was available last on WhatApps. Same as Facebook "Seen" feature. But, sometimes we don't want to let others know when we have visited last and if we have seen their message or not.  WhatsApp doesn't provide any setting in Android device to disable "Last seen Timestamp" feature. While in Ios, users can easily disable it using advanced settings. So today, we are here to help you to disable "Last seen Timestamp" feature of WhatsApp by an Android app- “Not Last Seen“. Don't worry Windows Phone and Blackberry users, we have also added a trick to disable  "Last seen Timestamp" in WhatsApp for you.
hide+last+seen+on+whatsapp
How To Disable "Last seen Timestamp" feature of WhatsApp
How To Disable "Last seen Timestamp" Feature of WhatsApp in Windows phone  and Blackberry devices.
Conclusion
- First of all, download “Not Last Seen“ from here, then install the app.

- Now in app, mark “Block last seen“ option.

- Again open WhatsApp and you will notice that your Mobile connection automatically going offline.

- Now read messages and reply/send messages that you received in WhatsApp.

- That's it.  You have read and sent messages successfully by hiding "Last seen Timestamp".

Trick behind this app: As I said earlier, after enabling this app, your connection goes offline while using WhatsApp. Now you can read messages that you received when the connection was online. When you leave WhatsApp, the connection will again go online and you receive messages and composed message will also be sent (while offline connection, composed messages will not be sent).

So, we have learned  how to disable "Last seen Timestamp" feature of WhatsApp. Next, we will show you how to disable "Last seen Timestamp" feature of WhatsApp in Windows phone and Blackberry devices.

Like Android, there are no apps available for  Windows phone  and Blackberry devices to disable "Last seen Timestamp". So, take look at below steps to disable it.

1. Disable the data connection on your device.

2. Once you have disabled the data connection, open your WhatApp and read or send messages.

3. Now close WhatsApp and enable your device data connection. By enabling it, WhatsApp automatically send all pending messages and it will not show the last seen time.

If you are really annoyed with "Last seen Timestamp" feature, then I am pretty sure that this trick helps you a lot to find a solution. Hope you loved this article. Let us know if you have issues related to this and kindly share this article. 
Labels:

Viber – Free Calls & Messages

16.11.13 3 comments

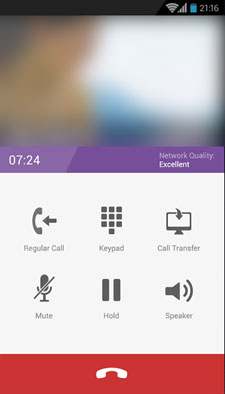
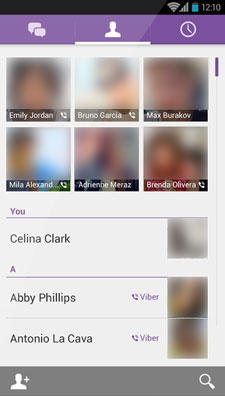
Viber-1Viber-2
With Viber, everyone in the world can connect. Freely. More than 200 million Viber users text, call, and send photo and video messages worldwide over Wifi or 3G – for free. Viber is available for many smartphones and platforms.
Viber is now compatible with and optimized for Android tablets!
On Viber, your phone number is your ID. The app syncs with your mobile contact list, automatically detecting which of your contacts have Viber.
• Text with your friends
• Make free calls with HD sound quality
• Groups with up to 100 participants
• Send stickers and emoticons, making messaging fun!
• Share photos, videos, voice messages and locations
• Create and send doodles
• Respond immediately to messages using quick reply
• OS integration – share photos and videos straight from your device’s gallery
• Designed with the Native Android UI in mind
• Push notifications guarantee that you never miss a message or call, even when Viber is off
• Support for the Viber Desktop application on Windows and Mac
Localized to: Hebrew, Arabic, Chinese (TR), Chinese (SP), Japanese, Russian, German, Spanish, Catalan, Italian, Portuguese (PT), Portuguese (BR), French, Turkish, Swedish, Korean, Dutch, Thai, Malay, Vietnamese, Tagalog, Hindi, Polish, Hungarian, Czech, Danish, Greek, Finnish, Indonesian, Croatian, Norwegian, Romanian, Slovak, and UkrainianViber is completely free with no advertising.
We value your privacy.
(*) Network data charges may apply


Size : 13MBCurrent Version : 4.0.0.1707
Requires Android : 2.2 and up

Link
Labels:

Remove Start.Qone8.com redirect (Virus Removal Guide)

13.10.13 2 comments

Start.Qone8.com is a browser hijacker, which is promoted via other free downloads, and once installed it will change your browser homepage to start.qone8.com and default search engine tosearch.qone8.com.

This in itself is not considered malicious as there are many legitimate programs that change these settings as well. What is considered malicious, though, is that it will also append the argumenthttp://start.qone8.com/ to random Windows shortcuts on your desktop and your Windows Start Menu.
[Image: Start.Qone8.com virus]
The Start.Qone8.com homepage will display advertisements and sponsored links in your search results, and may collect search terms from your search queries. The Start.Qone8.com hijack is used to boost advertising revenue, as in the use of blackhat SEO, to inflate a site’s page ranking in search results.
Start.Qone8.com it’s technically not a virus, but it does exhibit plenty of malicious traits, such as rootkit capabilities to hook deep into the operating system, browser hijacking, and in general just interfering with the user experience. The industry generally refers to it as a “PUP,” or potentially unwanted program.
Start.Qone8.com is an ad-supported (users may see additional banner, search, pop-up, pop-under, interstitial and in-text link advertisements) cross web browser plugin for Internet Explorer (BHO) and Firefox/Chrome (plugin) and distributed through various monetization platforms during installation. The browser extension includes various features that will modify the default or custom settings of the browser including the home page, search settings and in some cases will modify Internet Explorer’s load time threshold, place a lock file within Firefox to prevent competing software from changing its settings as well as disable the browser’s Content Security Policy in order to allow for cross site scripting of the plugin.
Start.Qone8.com homepage got on your computer after you have installed a freeware software (video recording/streaming, download-managers or PDF creators) that had bundled into their installation this browser hijacker.
For example, when you install Omiga Plus, you will also agree to change your browser homepage to start.qone8.com and default search engine to search.qone8.com.
[Image: Start.Qone8.com redirect]
However when you uninstall Omiga Plus from your computer, your web browser’s default settings will not be restored. This means that you’ll have to remove Start.Qone8.com homepage from your favorite web browser manually.
You should always pay attention when installing software because often, a software installer includes optional installs, such as this Start.Qone8.com browser hijacker. Be very careful what you agree to install.
Always opt for the custom installation and deselect anything that is not familiar, especially optional software that you never wanted to download and install in the first place. It goes without saying that you should not install software that you don’t trust.

How to remove Start.Qone8.com redirect (Virus Removal Guide)

STEP 1: Remove Start.Qone8.com browser hijacker with AdwCleaner

The AdwCleaner utility will scan your computer for Start.Qone8.com registry keys and browser extensions that may have been installed on your computer without your knowledge.
  1. You can download AdwCleaner utility from the below link.
    ADWCLEANER DOWNLOAD LINK (This link will automatically download AdwCleaner on your computer)
  2. Before starting AdwCleaner, close all open programs and internet browsers, thendouble-click on the AdwCleaner icon.
    [Image: AdwCleaner Icon]
    If Windows prompts you as to whether or not you wish to run AdwCleaner, please allow it to run.
  3. When the AdwCleaner program will open, click on the Scan button as shown below.
    [Image: Adwcleaner Scan]
    AdwCleaner will now start to search for Start.Qone8.com malicious files that may be installed on your computer.
  4. To remove the Start.Qone8.com malicious files that were detected in the previous step, please click on the Clean button.
    [Image: AdwCleaner removing infections]
    AdwCleaner will now prompt you to save any open files or data as the program will need to reboot the computer. Please do so and then click on the OK button.

STEP 2: Remove Start.Qone8.com from Internet Explore, Firefox and Google Chrome with Junkware Removal Tool

Junkware Removal Tool is a powerful utility, which will remove Start.Qone8.com hijack from Internet Explorer, Firefox or Google Chrome, and will double-check for any other compromised Windows shortcuts.
  1. You can download the Junkware Removal Tool utility from the below link:
    JUNKWARE REMOVAL TOOL DOWNLOAD LINK (This link will automatically download the Junkware Removal Tool utility on your computer)
  2. Once Junkware Removal Tool has finished downloading, please double-click on the JRT.exe icon as seen below.
    [Image: Junkware Removal Tool]
    If Windows prompts you as to whether or not you wish to run Junkware Removal Tool, please allow it to run.
  3. Junkware Removal Tool will now start, and at the Command Prompt, you’ll need to press any key to perform a scan for the Start.Qone8.com virus.
    [Image: Junkware Removal Tool scanning for Start.Qone8.com homepage]
    Please be patient as this can take a while to complete (up to 10 minutes) depending on your system’s specifications.
  4. When the scan Junkware Removal Tool will be completed, this utility will display a log with the malicious files and registry keys that were removed from your computer.
    [Image: Junkware Removal Tool final log]

STEP 3: Clean up the various Windows shortcuts that have been hijacked by Start.Qone8.com virus

The Start.Qone8.com infection will hijack your Desktop, Taskbar and Start Menu shortcuts by adding to your browser shortcuts the argument http://start.qone8.com/…... In this third step, we will need to remove this malicious change from your browser shortcuts.
  1. Search for your browser shortcut (Desktop, Taskbar or Start Menu Shortcut), then right click on it and select Properties.
    [Image: Firefox Shortcut properties][Image: taskbar shortcut hijacker]
  2. In the Shortcut tab, in the Target field, remove the http://www.Start.Qone8.com argument. Basically, there should be only the path to browser executable file. Nothing more.
    [Image: Start.Qone8.com shortcut hijack]
If you are experiencing problems while trying to remove the Start.Qone8.com search shortcut hijack, you can download Shortcut Cleaner from the below link, and then you’ll just need to run this utility to fix your Windows shortcuts. When it is done, it will show you a log that contains a list of shortcuts that were cleaned.
SHORTCUT CLEANER DOWNLOAD LINK (This link will open a new webpage from where you can download Shortcut Cleaner on your computer)

STEP 4: Remove Start.Qone8.com malicious files from your computer with Malwarebytes Anti-Malware Free

Malwarebytes Anti-Malware Free utilizes Malwarebytes powerful technology to detect and remove all traces of malware including worms, trojans, rootkits, rogues, adware, spyware and more.
  1. You can download Malwarebytes Anti-Malware Free from the below link,then double click on it to install this program.
    MALWAREBYTES ANTI-MALWARE DOWNLOAD LINK (This link will open a download page in a new window from where you can download Malwarebytes Anti-Malware Free)
  2. When the installation begins, keep following the prompts in order to continue with the setup process.
    Do not make any changes to default settings and when the program has finished installing, click on the Finish button.
    [Image: Malwarebytes Anti-Malware final installation screen]
  3. On the Scanner tab, select Perform quick scan and then click on the Scan button to start scanning your computer.
    [Image: Malwarebytes Anti-Malware Quick Scan]
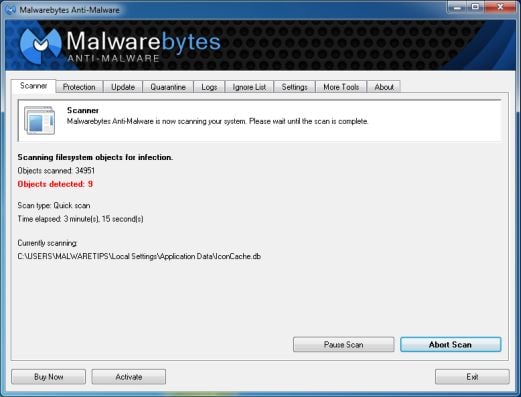
  4. Malwarebytes’ Anti-Malware will now start scanning your computer as shown below.
    [Image: Malwarebytes Anti-Malware scanning for Start.Qone8.com virus
  5. When the Malwarebytes scan will be completed,click on Show Result.
    [Image: Malwarebytes Anti-Malware scan results]
  6. You will now be presented with a screen showing you the malware infections that Malwarebytes’ Anti-Malware has detected.Please note that the infections found may be different than what is shown in the image.Make sure that everything is Checked (ticked) and click on the Remove Selected button.
    [Image:Malwarebytes removing malware]

STEP 5: Double check for the Start.Qone8.com infection with HitmanPro

HitmanPro is a second opinion scanner, designed to rescue your computer from malware (viruses, trojans, rootkits, etc.) that have infected your computer despite all the security measures you have taken (such as anti virus software, firewalls, etc.).
  1. You can download HitmanPro from the below link, then double click on it to start this program.
    HITMANPRO DOWNLOAD LINK (This link will open a new web page from where you can download HitmanPro)
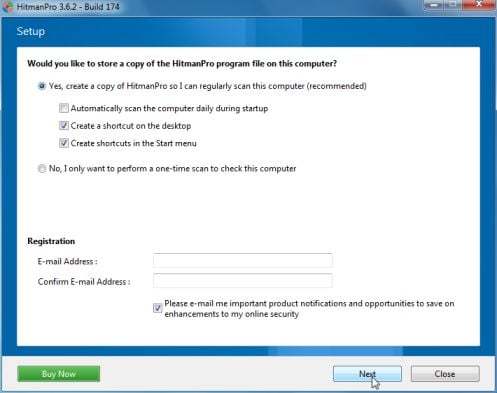
  2. HitmanPro will start and you’ll need to follow the prompts (by clicking on the Next button) to start a system scan with this program.
    HitmanPro installation
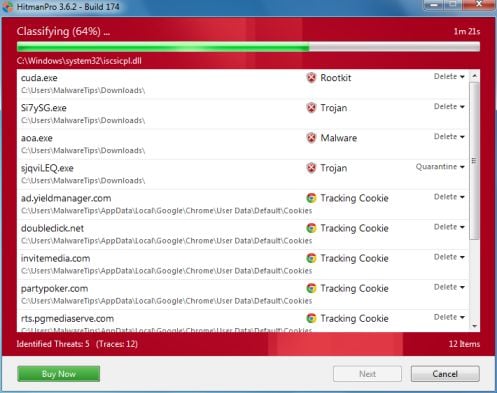
  3. HitmanPro will start scanning your computer for malware, as seen in the image below.
    HitmanPro scanning for Start.Qone8.com virus
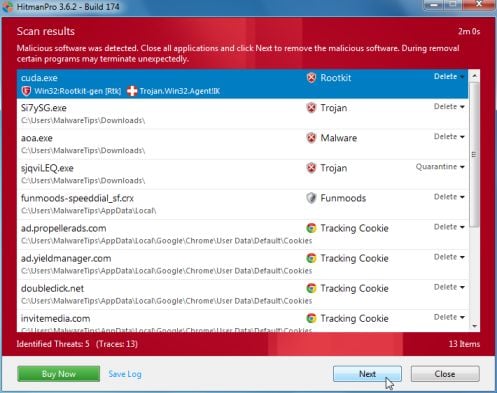
  4. Once the scan is complete,you’ll see a screen which will display all the infected files that this utility has detected, and you’ll need to click on Next to remove these malicious files.
    HitmanPro scan results
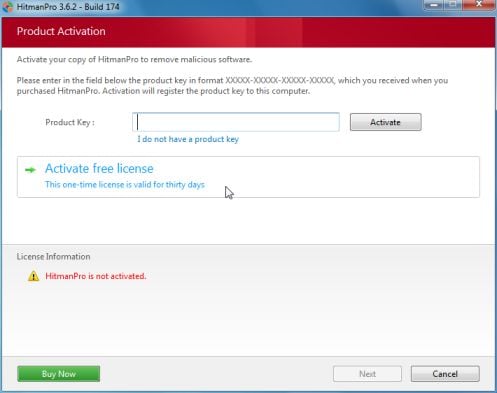
  5. Click Activate free licenseto start the free 30 days trial and remove all the malicious files from your computer.
    HitmanPro 30 days activation button

Your computer should now be free of the Start.Qone8.com infection. If your current anti-virus solution let this infection through, you may want to consider purchasing the PRO version of Malwarebytes Anti-Malware to protect against these types of threats in the future.
If you are still experiencing problems while trying to remove Start.Qone8.com hijacker from your machine, please start a new thread in our Malware Removal Assistance forum.
Labels:

Add A Different Background For Author Comments In Blogger's Threaded Comments

n this tutorial we will learn how to highlight the author comments so that they will have a different background color, border, or anything that makes them stand out from the others. To achieve this, we need to add a code in the Blogger's template and to modify the style according to our preferences.
blogger tricks, blogger comments
  

HOW TO HIGHLIGHT AUTHOR COMMENTS IN BLOGGER:

Step 1. Go to Template, click on Edit HTML

blogger threaded comments, customize blogger comments

Step 2. Click anywhere inside the code area and try to find - using CTRL + F keys - this tag:
 </body>
Screenshot:
blogger comments, blogger tricks

Step 3. Just above it, paste the following code:
 <script src='http://code.jquery.com/jquery-latest.js'/>
<script>
$(function() {
function highlight(){
$('.user.blog-author').closest('.comment-block')
.css('border', '1px solid #FFA500')
.css('background','#F1F1F2 url("http://www.blogblog.com/1kt/transparent/white80.png")')
.css('color', '#444444')
.css('font-size', '12px')
.css('padding', '10px');
}
$(document).bind('ready scroll click', highlight);
});
</script>

Customizing the Author Comments:


Border:
The line marked in orange represents the border's style.
What it can be done:
  • 1px - you can increase the value to change the border's thickness
  • solid - change the border's style to dotteddashed, inset, outset etc.
  • #FFA500 - this is the border's color value, change it with your own color

Background:
The line marked in blue represents the background's style. You can use a plain color or an image. By default there's a combination of both (a white transparent image with a gray plain color).
To change/add:
  • a different color: replace the #F1F1F2 value with your own (use this tool to find the hex code of your desired color)
  • an image: replace the defaul url http://www.blogblog.com/1kt/transparent/white80.png with that of your image

Font Color:
To change the font's color, replace the #444444 color value in green with your own. (you can use this tool to find the hex code of your desired color)

Font Size:
Modify the value in red by increasing/decreasing the "12" value in order to change the size of text.

Step 4. Now Save your Template.

To customize the entire style of threaded comments, please check my previous tutorial on How to Customize Comment's Background, Font Color and Border in Blogger.
Labels: